Awesome Blossom! Paper Flower Virtual Workshop Series

My arrangement for Awesome Blossom! using the flowers taught in this virtual workshop series
Join me and Quynh Nguyen of Pink and Posey for a series of 8 virtual paper flower workshops called Awesome Blossom!
When Quynh of Pink and Posey first suggested that we do a paper flower virtual workshop series together, I hesitated. I don’t like committing to any long term plans when I don’t know what’s happening in a year for me. I blame it on my kids’ unpredictable schedule as a result of the pandemic, and my own plans for Crafted to Bloom.
Eventually Quynh wore me down and I decided it would be fun to teach in a different way and be accountable to someone else. Honestly, it’s SO hard to be accountable to myself when I’m so busy with the boys. I haven’t been able to release an online course in a year because it always gets pushed over other opportunities. Thank goodness for deadlines or I would never be able to commit to any commissions.
So why call it Awesome Blossom!?
Because my husband named it so. Quynh and I wanted something that would convey the fun we have making paper flowers with other paper flowers obsessed. Awesome Blossom! (that's right - with an exclamation mark!) just seemed right - it's both familiar (apparently it's the name of the blooming onion) and rolls off the tongue (try saying it a few times in a row - see it's no tongue twister). I mean just check out the logo that Denise Sakaki designed for us! (at bottomw)
The other reason? We're feeling hopeful that in-person events would be permitted again and with this virtual workshop series culminating in an in-person workshop at Holly Chapple's Hope Flower Farm in Loudoun County, Virginia, USA in 2022, the word “awesome" is a word we want to use A LOT to describe what we're doing (and I already tend to overuse this word already).
Once we nailed down the name, we had to decide on the flowers. I’ve never had to coordinate with another person on deciding flowers and colours and I have to say it wasn’t easy. In the end, I think I just sort of imposed my colour palette on Quynh and we worked out the flowers. I’ll be teaching a light pink bomb peony, burgundy/dark fuchsia hybrid tea rose, and blue green eucalyptus. Quynh will be teaching a white and burgundy Japanese anemone, pink double flowered stock, and a white and pink flowered jasmine vine. This is our “dark” palette. We also offer suggestions on how to make a “light” palette.
Awesome Blossom! will have 8 workshops over the course of several months from September 2021 to May 2022:
SEPTEMBER ‘21 - Basic Paper Flower Techniques
OCTOBER ‘21 - Eucalyptus
NOVEMBER ‘21 - Pink Jasmine Vine
JANUARY ‘22 - Hybrid Tea Rose
FEBRUARY ‘22 - Japanese Anemone
MARCH ‘22 - Bomb Peony
APRIL ‘22 - Double Flowered Stock
MAY ‘22 - Paper Flowers Mechanics and Arrangement
Each of these workshops can be purchased separately for $85/each, but you can buy all 8 workshops as a bundle right now at a discounted price of $297! This offer is only available between July 26 and August 6, 2021 though!

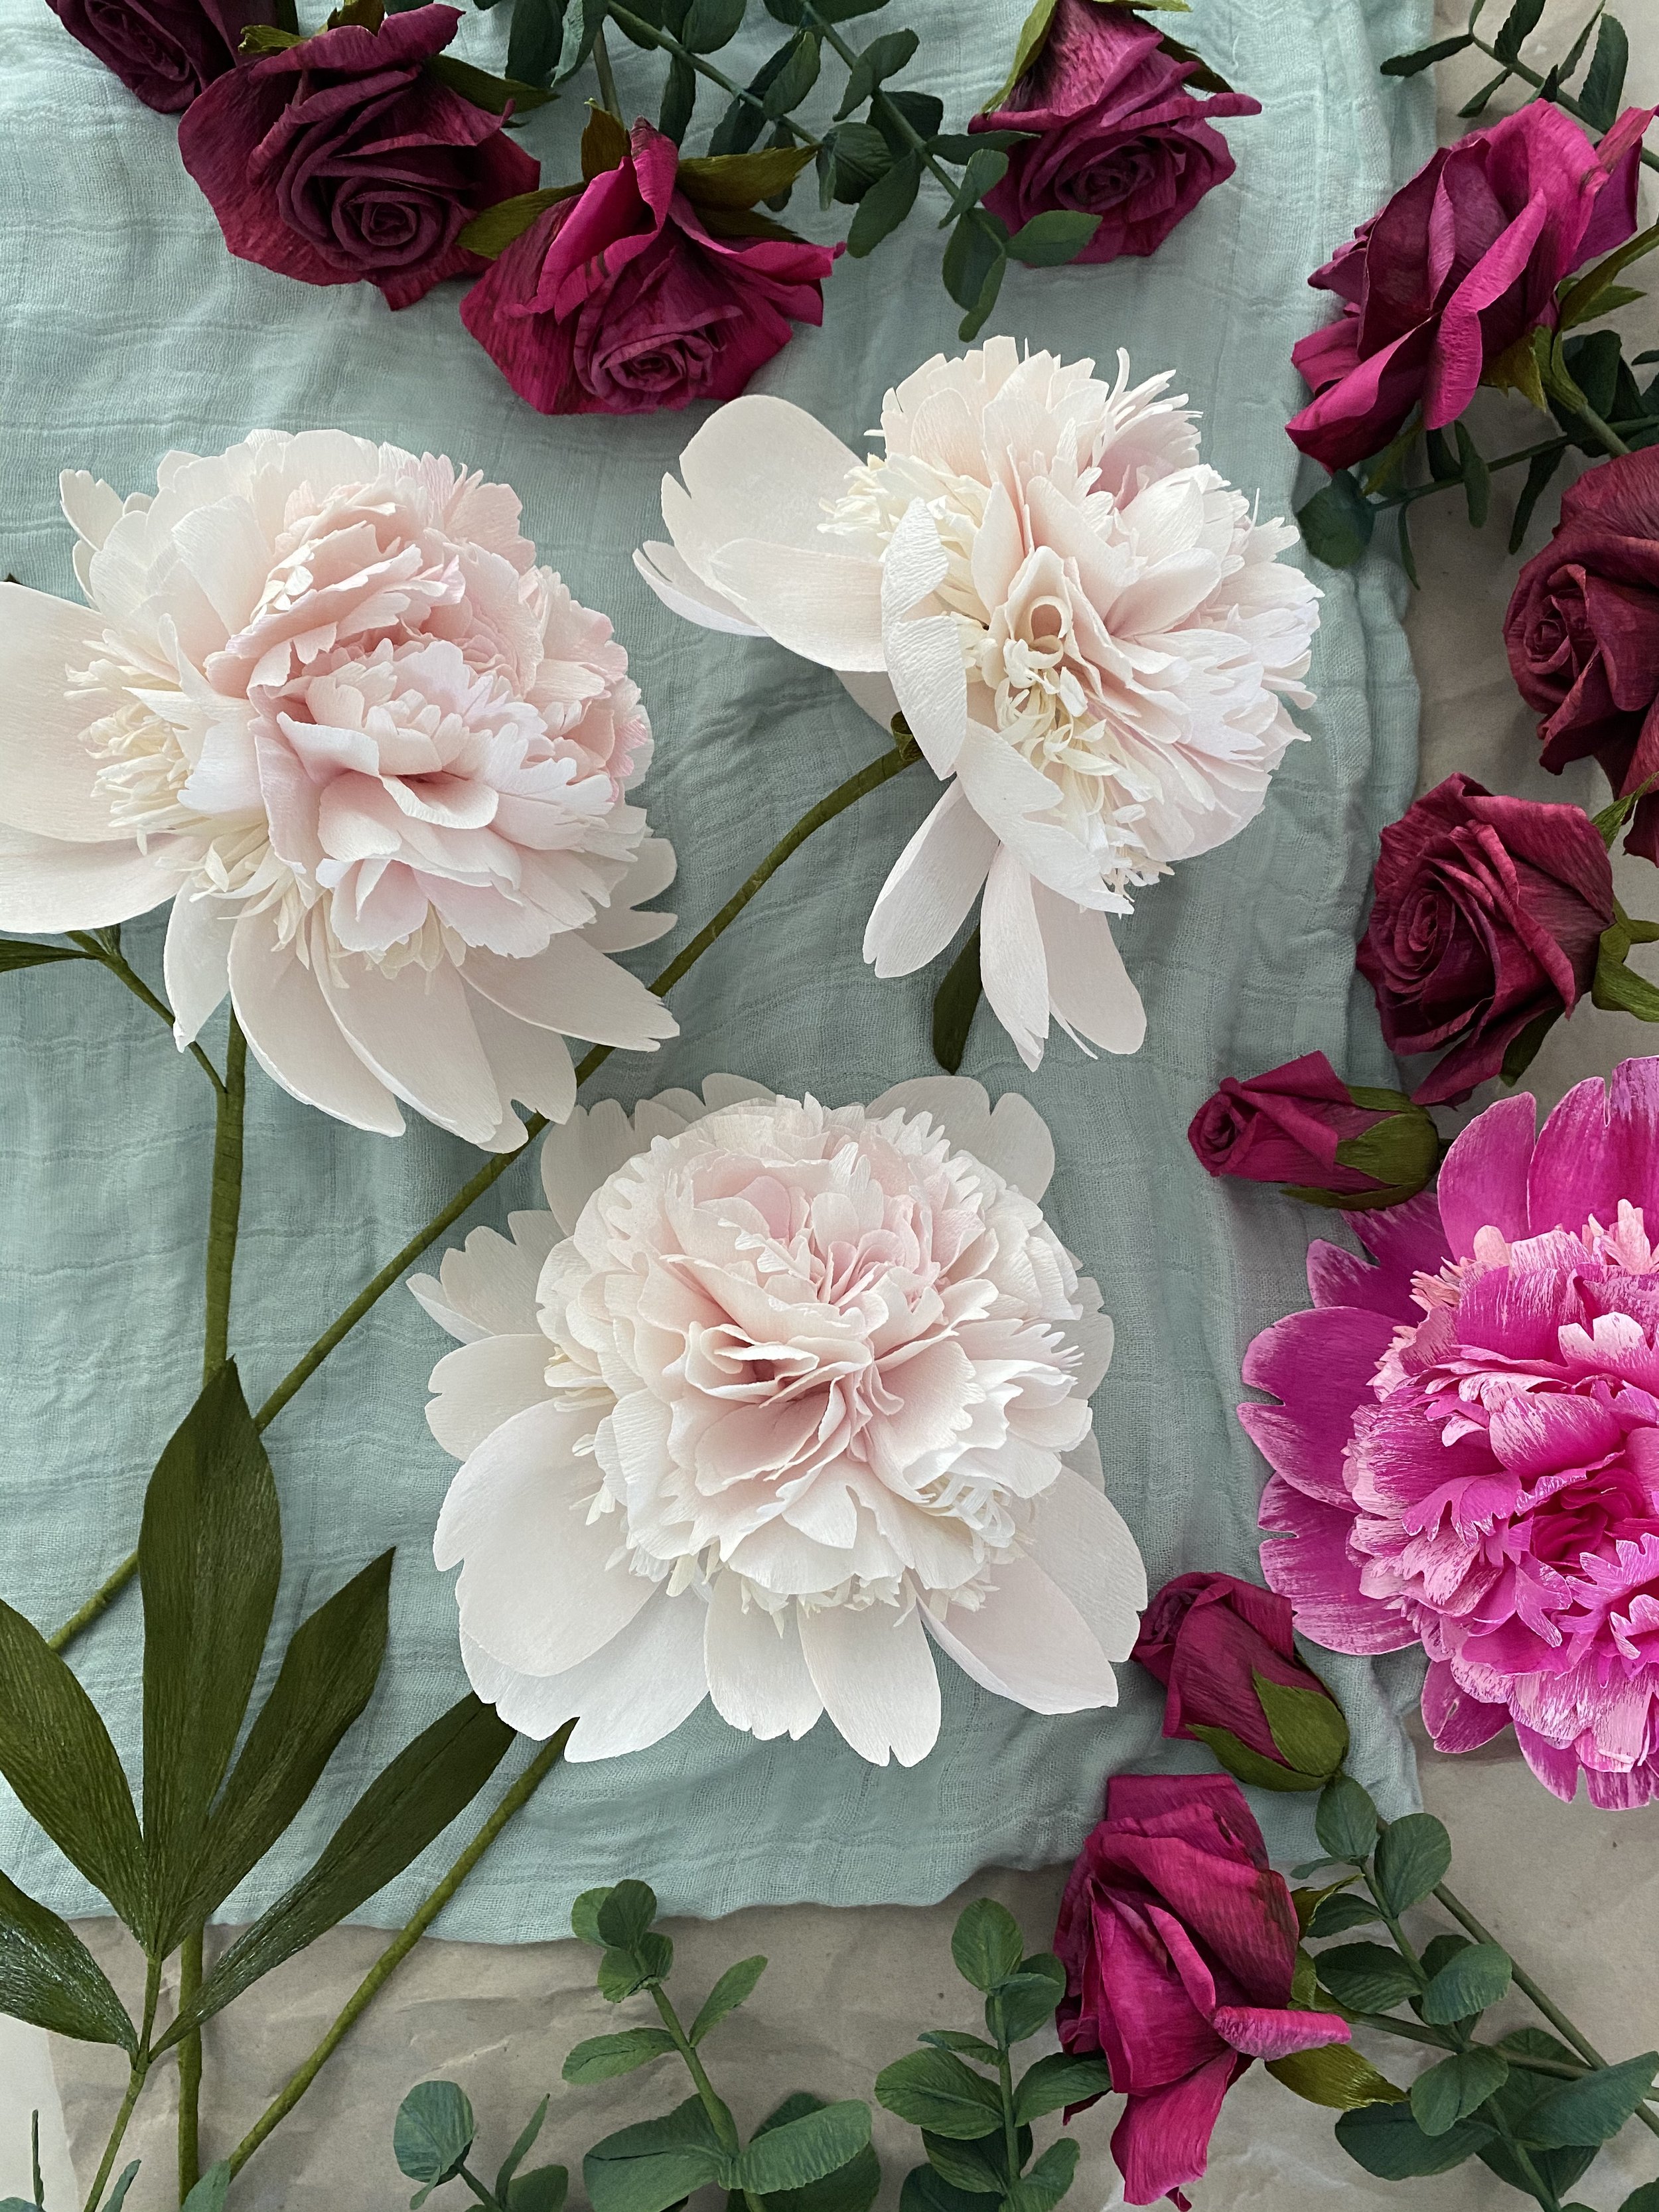
From left to right: Bomb Peony, Hybrid Tea Rose, and Eucalyptus by me. Jasmine vine, Japanese anemone and double flowered stock by Quynh.
Here’s a lowdown of the flowers I’ll be teaching:
BOMB PEONY -

Quynh really wanted me to teach my bomb peony (you can read about it here on her blog about the origins of Awesome Blossom!) and truth be told, I’m still a little possessive about it. There are some flowers that I make that are really true to my aesthetic and style. Sort of like how Kate Alarcon has her mushrooms, Margie Keates has her version of a bomb peony, and Quynh has her dahlias. No one makes those botanicals quite like them and anyone who sees their version would know it’s made by their hands. For me, it’s this bomb peony. It’s aesthetically very strong. Not that I’m particularly keen on peonies (my favourite flower is actually the foxglove), but it’s the way this particularly bomb peony expresses itself that’s wholly an expression of my inner self. So to expose myself and to teach other people how to express the same…it’s uncomfortably close to bearing my soul. And then knowing it’ll be out there made by other people taking on my expression..and then selling it……well it gives me pause. If you’ve ever taught your own paper flowers, you likely understand.
I don’t do anything half-heartedly, and it didn’t even cross my mind to share only a bit of how I make my flowers. For me it’s all or nothing. So when I share how I make my bomb peony, you’ll learn exactly how I make it, with the exception that I will teach a less tedious version during the live virtual workshop, but you’ll be provided with bonus tutorial videos on how I make mine even more realistic (and more tediously - so more advanced). I decided this was the best way to present the tutorial without overwhelming any student who may just be picking up the art of paper flowers. To give you an idea of how many petals there are, it will take you about an hour to just cut the petals. So not for the faint of heart! But I teach it so that anyone can learn how to make my bomb peony.
In truth I don’t think my version is difficult to make. I think it just takes a long time because there are so many petals and you have to shape each one. To ensure learning and making the bomb peony is FUN rather than tedious, I am teaching it over the course of two days. The first day we focus on the bloom and the second day, we focus on the calyx, leaves and finishing.
For me, the most challenging part of any peony is creating the negative space around the petals so the camera picks it up. Too often I’ve made peonies that look like crumpled and used Kleenex (I think Holly Dionisi of Everfleur Designs uses this same analogy) because there are lots and lots of petals. I know it’s probably not what most people think is the most challenging thing. But it is. It’s the form of the peony that we often get wrong. We think we just need lots of petals, lots and lots of petals! yet it’s not as simple as dissecting a peony and then copying the petal shapes/sizes and number of petals etc. The negative space is the key. You create negative space through how you construct the different parts of peony and how you attach the petals to it. It is also where you can bring your style in - whether you want it to look airy or heavy, in full bloom or not quite ready.
For this bomb peony, I’ve utilized techniques that I’ve used in other peonies and other flowers I’ve made. So it wasn’t a big stretch. (But that makes sense because I’ve found that any technique that is too big of a stretch often means one of two things: You’re not at the skill level or experience where you’re ready for it yet, or it’s not a technique that comes naturally to your style.) As usual, I leaned on techniques that create a randomness in a controlled way, and techniques that relied on the crepe paper’s personality when stretched in different ways. It’s what I’ve always done, but just put together in a different way. I love full blooms with petals that push away from their centres and dance in the air like the skirt of a dress. I like to define the waist of the bloom with delicately curved stamen fringes in a subtly different colour for definition. I love creating ruffles and waves within a mass of petals so that your eyes know where to travel. I want my flowers to make a statement, so giving them space within an arrangement is what I try to do. I’ll try to teach all of this (and more) this bomb peony workshop!
HYBRID TEA ROSE -

When I design an arrangement, all of the flowers I choose have a function. The bomb peony is the star. The hybrid tea rose therefore can’t also be the star. It must take a less primary place. So it’s not going to have large blooming petals; it must be tight to fill in the spaces between the bomb peony. It should create depth so it must be darker to mimic the dark shadows within the arrangement. It needs to also be able to fit into the overall colour scheme, so with other pinks, it needs to bridge the gap between moodiness and sweetness. A burgundy or dark pink colour would be able to ground the arrangement and also tie in the pinks of the jasmine vine and bomb peony.
The hybrid tea rose I decided to make and teach has a tighter centre with petals that look like they naturally fall from the centre. I made it with 180 g laminated Italian crepe paper because I knew that laminated 180g could withstand pressure on a flower. Layering the flowers and using them to fill gaps requires it to be structurally durable, even hard or stiff to touch. I had made these for my dark “black” bouquet as fillers and they worked really well. I also decided to teach a bud too because I wanted to show how you can use the same techniques in a slightly different way. Again, the underlying structure is key and I teach you how to keep the flower looking like a tear-drop (which is always a challenge).
This time, I played with two types of dark red crepe paper and mixing their dyes together. Whenever you want to create variation in colours among the same type of flower, I’ve found that all you need to do is choose 2 papers with similar colours (but not the same) that can be slightly different in tones, hues, or even value, and then apply a third colour on top using pastel, paint etc. on it. That third colour will tie the two papers with similar but different colours together, and by varying how much of the third colour you use, it will create further variations.
I also used a colouring technique to create depth and shadows in my petals that painters use, but does not come naturally to non-painters. Complementary colours! More on this in the workshop.

EUCALYPTUS -
Pinks always pop when there’s bluish foliage and eucalyptus is known for its bluish base. It’s also a foliage that lots of people have trouble figuring out so I thought it would be the perfect foliage to teach. One of the trickiest parts of arranging is covering the mechanics and I’ve found that spiral eucalyptus does a decent job because of its shape. The petals sit perpendicular to the stem so when you look directly from the end of the stem, the leaves cover the space around it quite well.
I have a eucalyptus leaf tutorial in my book, Paper Flower Art, where I use 180g Italian crepe paper in a dark green and I then colour it with a light blue pastel. This time, I’m using a lighter green and colouring it with a different pastel and providing an alternative way to spray it to achieve a more citrus look. I just love the mix of blue and sour foliage. It looks so darn interesting. The key to making any foliage is to not be fooled by how light and airy you want it to feel. It doesn’t matter! What matters is how it will hold up when you’re arranging it. When the stem is too soft and supple it can be incredibly difficult to keep it in its place in an arrangement. I used to use 20 gauge for all of my leaves, even the long stemmed ones, but I’ve since started to use 18 gauge because those stand up to the pressures of the surrounding flowers. I’ll speak more on how to choose the right stem wire gauge during the workshop.
QUYNH’S FLOWERS -
Quynh is teaching the jasmine vine, Japanese anemone, and double flowered stock. I’ve made both the jasmine vine and Japanese anemone before and let me tell you, we make them so differently! In a good way though! My jasmine vine was much smaller all around and while they looked delicate, they didn’t really show up in photos of the arrangement I used it on. Quynh’s jasmine vine was the right size to make a statement. I couldn’t really place it on top of of between flowers, but I was able to let it hang out in a showy way. To assemble her leaves, she used the same technique that she used on her recent large leaf installation - by sewing it! I can’t wait to see her demonstrate it in the Jasmine Vine workshop. As for her Japanese anemone, it has a round of super fine yellow stamens and she’s going to teach how she does that during the Japanese anemone workshop. Her double flowered stock is full and fluffy and I can just imagine how much thought she put into making sure it wasn’t too labour intensive to get those stunning results.
Quynh talks more about her flowers and Awesome Blossom! in this post.

Quynh’s Jasmine vine, Japanese anemone, and double flowered stock
Bundle versus Individual Workshop
Right now we have an offer for the bundle of 8 workshops - buy the entire workshop series for $297 from now until Friday August 6, 2021. You can buy each workshop separately for $85, but the bundle really is a steal (you save almost $400!). We really want to be able to guide you through this entire process of building up your skills and foundations leading to the design and creation of the arrangement. When we were brainstorming about what we wanted this workshop series to be about, we really were designing it to be an experience so that when you finish the workshop, you’re a changed paper florist.
INTERESTED? You can read more about Awesome Blossom - the details, FAQ, the full schedule and flower descriptions - on Paper Talk. Hope to see you there!