How to Make Berry Sprigs and Seeds for Seeded Eucalyptus

Easy and quick way to make berry branches and seeded eucalyptus seeds
My technique of making berry sprigs and seeds for seeded eucalyptus is easy and surprisingly effective. Save time by creating berry branches and seed pods with just wire and styrofoam balls. Learn more paper flower art on my education website Crafted to Bloom with Jessie Chui.
A few years back when I was scrolling through Pinterest, I came across art made by twisting wires. These artists would use wires and twist them into different forms like trees and jewelry. I was so mesmerized by the simplicity of the art, and it also sparked an idea in me. It is incredibly time consuming attaching each and every stem using crepe tape. Why not use try this twisting technique to make sprigs? Since then, I’ve been using this technique for all of my smaller textural berry and seed pieces.
The amazing thing about this technique is that it is so effective. The key is to use really thin (but strong) wire and twist them really tight and in the same direction so that the twists aren’t super obvious and/or lumpy. It’s also really fun to plan as you go, and it reminds me of my berry branch technique (you can watch the video here in 4 parts: How to Make a Berry Branch Part 1 - Part 2 - Part 3 - Part 4).
Here are some examples of bouquets/arrangements that I’ve made using berry sprigs and/or seeded eucalyptus from this technique:

Seeded eucalyptus to bring in additional texture along the edges of this bouquet/arrangement.
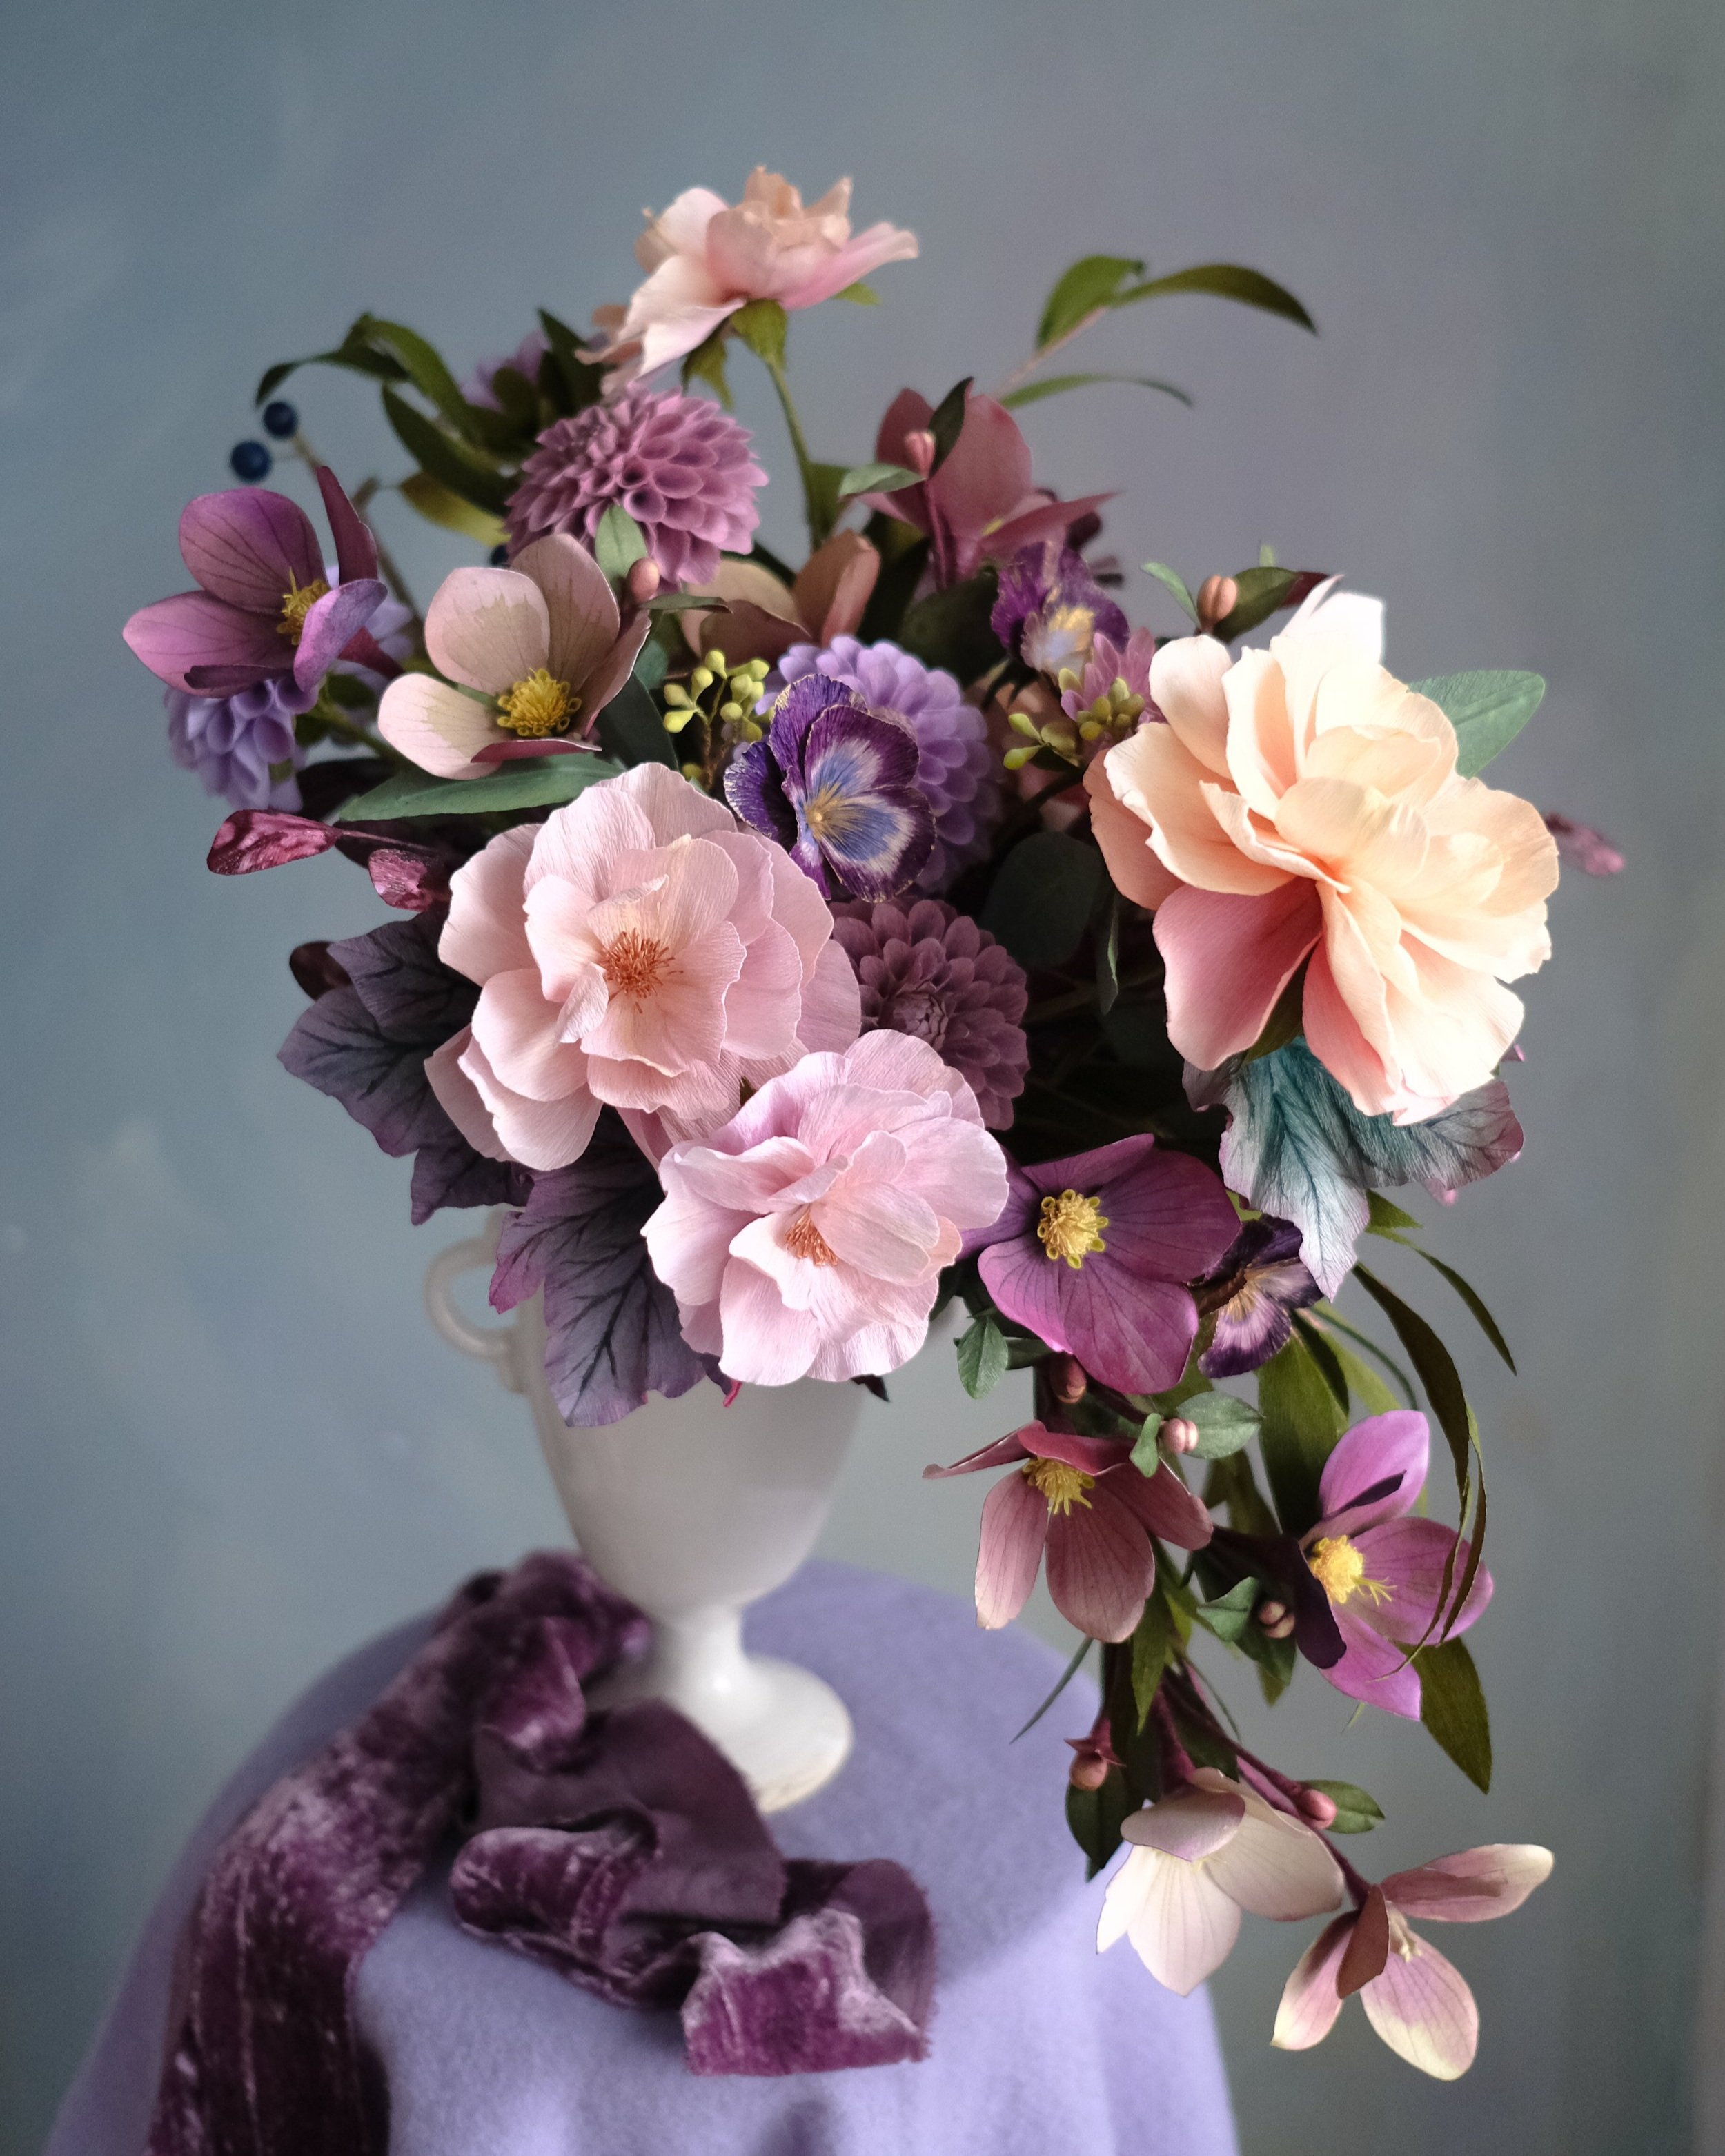
I made seeds from clay to create the seeded eucalyptus you see here in this bouquet.

Blush bouquet that incorporates pink berries for texture and for a punch of bolder colouring.

Corsage using pink berries to fill in spaces between larger flowers.
Side note: Read this blog post, "Eucalyptus Green Technique for Paper Flowers" if you’re interested in learning how to create the beautiful blue-green leaves of both of these arrangements.
Materials & Tools
Here’s a list of materials and tools you’ll need to make the basic sprig:
Tiny styrofoam micro beads/balls (alternative: small clay balls or beads)
30-33 gauge stem wire (for small stems)
18-20 gauge stem wire (for main stem)
Wire cutter
Spray paint (like Design Master sprays) or paint in desired colour
Floral tape or crepe tape to finish off
DISCLOSURE - When you click on my affiliate links, I may earn a commission for qualifying purchases made through Amazon.com links in this post. This commission goes directly into the maintenance of my website, the technology that goes into my courses, and my art. Want to know more? Read my Amazon Affiliate Disclaimer.
Quick Tips
Here are a few tips based on my experience.
You really can keep adding more and more stems (twisted and singles) as you go and create a really amazing textural effect. As you accumulate wire though, you may want to trim them off at different lengths to reduce the bulk smoothly.
I’ve used both green and white paper-wrapped stem wires (I prefer the 30 and 33 gauge stem wires like these Sunrise Branded ones. I mainly make pink/red/green berries or seeds, so when I spray the styrofoam balls, I also spray the stem wires. You can also brush on paint instead of spraying them.
I bought my tiny styrofoam beads/balls at Oomomo and any fabric/craft store will carry them. The one I have are probably about 4-5 mm wide in diameter. BUT you don’t necessarily have to use tiny styrofoam beads/balls. I’ve made seeded eucalyptus by making tiny seed pods with Crayola Magic Clay (affiliate link) instead and replacing the beads with the pods.
Below is a pictorial tutorial below with instructions. Feel free to Pin it on Pinterest :) Let me know what you think in the comments below this post!
The Tutorial & Instructions
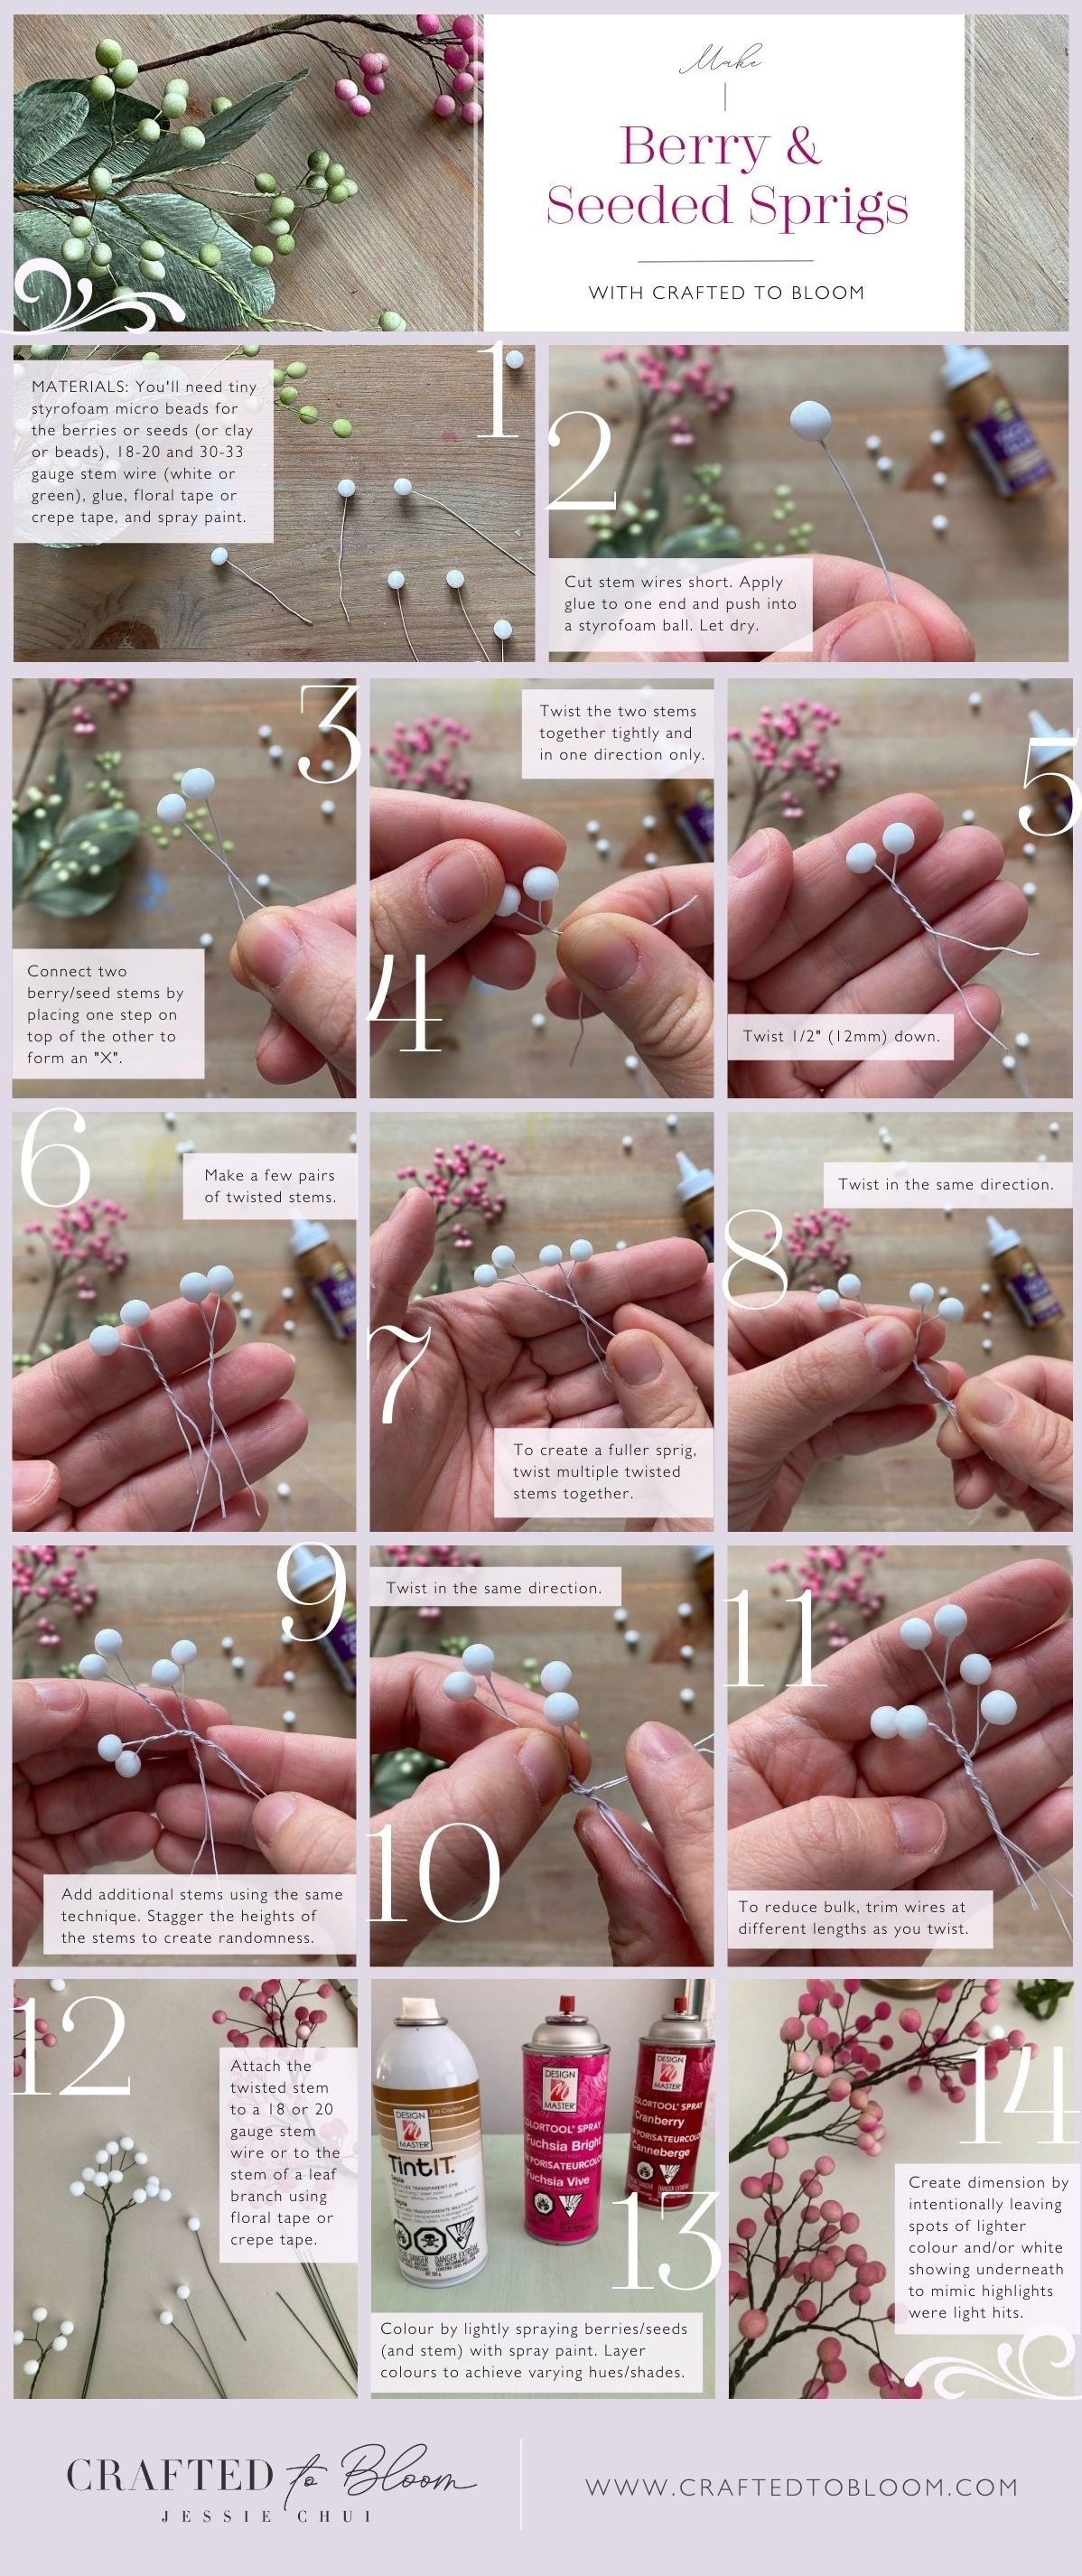
You'll need tiny styrofoam micro beads for the berries or seeds (or clay or beads), 18-20 and 30-33 gauge stem wire (white or green), glue, floral tape or crepe tape, and spray paint (or paint).
Cut stem wires short. Apply glue to one end and push into a styrofoam ball. Let dry.
Connect two berry/seed stems by placing one step on top of the other to form an "X".
Twist the two stems together tightly and in one direction only.
Twist 1/2" (12mm) down.
Make a few pairs of twisted stems.
To create a fuller sprig, twist multiple twisted stems together.
Make sure to twist in the same direction.
Add additional stems using the same technique. Stagger the heights of the stems to create randomness. Add twisted stems one at a time.
Twist in the same direction.
To reduce bulk, trim wires at different lengths as you twist. Then add additional twisted stems.
Attach the twisted stem to a 18 or 20 gauge stem wire or to the stem of a leaf branch using floral tape or crepe tape. Snuggle the tip of the stem wire within the twisted stem for a smoother transition.
Colour by lightly spraying berries/seeds (and stem) with spray paint like Design Master. Here I’ve used DM ColorTool in Fuchsia Bright and Cranberry and DM TintIt in Sepia. Layer colours to achieve varying hues/shades. For example, spray on the lightest colour first (eg. Fuchsia Bright), then layer in a darker colour and concentrate on spraying the base of the styrofoam beads/ball (eg. Cranberry). It’s optional to have a third colour. I' used the Sepia to create a warmer overall temperature.
Create dimension by intentionally leaving spots of lighter colour and/or white showing underneath to mimic highlights were light hits.
WANT TO LEARN MORE?
I share numerous paper flower making techniques in my book, Paper Flower Art (GMC, 2019) (BUY IN HARDCOVER or IN PAPERBACK) or head to my education website, CRAFTED TO BLOOM, for more in-depth learning.